From the search for the right domain name to suggestions for good blog texts to tips for more traffic: exciting content is important for a well-running blog, but not everything. Here you will learn step by step what you as a new blogger should know and pay attention to - with lots of practical examples and clearly explained.
Whether companies, classic car fans, cat lovers or mothers: (Almost) everyone has their own blog today. So just add some blog to the tens of millions? Nope, a little objective must be already. The blog, whose creation you can follow here, is supposed to be a business card for me on the one hand, on which I can be found as a copywriter and author also by strangers/new clients in the net. On the other hand, he is supposed to provide his own income in the long run. In view of this objective, it is not enough just to get started and write the first blog text. Planning and preliminary work are in demand.
My original plan was to secure the domain cantzler.in. Funny pun with my last name and actually good to remember. Funny perhaps, but not good, was counterargumented by experts. Simply because .de and .com are much more common, at least in this country. So reconsider: What is this page about? Which terms do I want to be found with?
I don't find the tip to go to the local level when searching for names and to choose texte-hamburg, for example, one hundred percent suitable. In my opinion, texte-online is also not suitable. What speaks against the local reference is that my texts are not written specifically for northern Germany and I also want to address customers in other regions. What speaks against texte-online is that it's not just about blog or website texts, since I also write classic print stories.
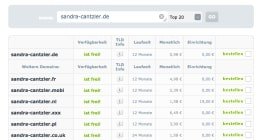
Result of the not quite simple name search: After another Mrs. Cantzler was smart enough a long time ago to secure cantzler.de and cantzler.com, I try the alternative sandra-cantzler.de - and have more glasses. Of course, we could now try out a lot with the help of various creative techniques. But as I said, I'm also interested in having a blog as a platform for my work and for me - so my own name fits quite well.
My webhosting package still includes two domains I haven't used before - but now! If you are already a customer of checkdomain, simply register your domain in your personal customer area. All you need is a few clicks. Within a short time you will receive an email confirming your order and then a message as soon as the registration has worked.

Now software must be on the page so that afterwards the first contents can be on it. So there's another decision to be made. Since my programming skills are zero and I have been used to WordPress for years, I stick to it. WordPress is the most used blog software in the world and in my experience quite comfortable to use. In addition, there are numerous themes for WordPress blogs to choose from (more on that later). But of course there are also a lot of other programs to choose from - like Serendipity, which we have already introduced here in this blog.
During the installation I'm lazy (or more nicely expressed: comfortable) and use the software installer for the installation. So you only have to set a few checkmarks again. A short thought was required at this point:
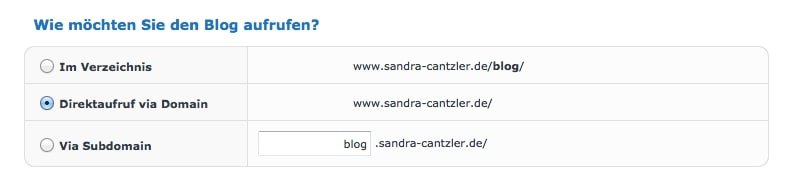
Since in this case nothing else than a blog should be on the page, I click on the direct call. If you already have a website and would like to add a blog to it or if you are planning a website including a blog, the Optio nvia Subdomain would be more useful.
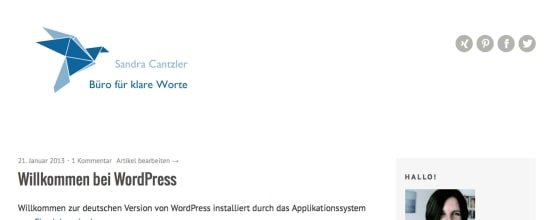
The search for a suitable name and the thematic orientation takes or is a thing, for which time should be taken absolutely. The domain registration and the blog installation including WordPress on the blog fit, on the other hand, go very, very fast. Even laymen don't need more than a few minutes (plus waiting time, of course). And this is how the finished work looks like:
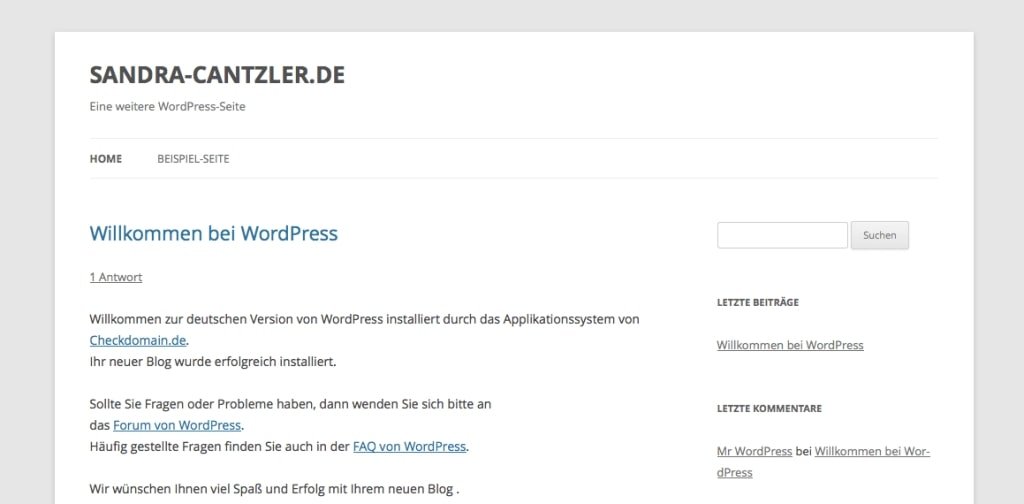
Important: Change the automatically generated password immediately and change the setting in the Privacy section of the admin area (and then in the left sidebar) so that the blog is not yet found by search engines. Because there is still absolutely nothing to read, see or hear here.
The initial question: Which keywords fit my project? As I said, it's about my work, i.e. texts or texts. Alternatively, terms such as "writing", "author" or "editing" can also be considered. In addition, there are a whole host of possible combinations.
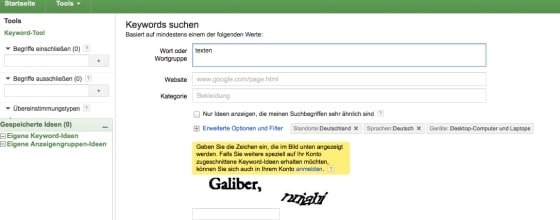
To find out if text is a good keyword, the Google AdWords keyword tool is extremely helpful. Important: To use it, you need to be registered with Google.
The keyword tool shows: The search term "text" brings more than 9 million local search queries per month. But even the fact that you fly over the table is sobering: If you're looking for the term "text", you're more likely to be looking for Christmas and children's songs, perhaps even texts for birthday and Christmas cards. But this has nothing to do with my job.
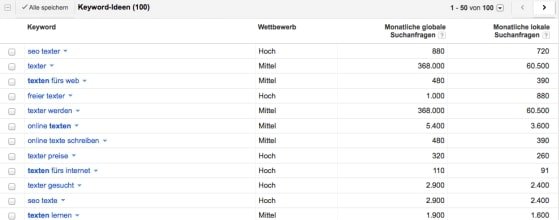
Next attempt with the term "text". And that brings me a bit closer to the point. However, the number of search queries is much lower and with some search terms almost encouragingly low. Among the most promising candidates are "Texter" and "Texter werden", also SEO texts and Texter gesucht still rank relatively high, as well as "Texter gesucht". The situation is therefore not hopeless, although it appears that the blog will move thematically in a relatively small niche. The challenge is accordingly great to select and place the keywords skilfully in order to still achieve some traffic.
Basically, the same applies to keyword searches: Don't just test one term, but try out different variants. For example, in combination with the place of residence or work, if that plays a role. Or work with synonyms. In my case this could be "writing", "author", "editor"... be. Who would like to start a Blog approximately around family topics, can search for family, parents, children, baby, education etc. - at this point your Kreaitvität is in demand.
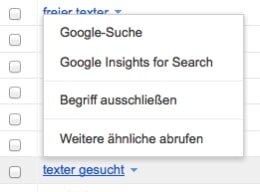
In order to get more clarity as to exactly where to go, I will take a closer look at terms from the hit list in the next step. First see what the Google search results show - for example for "Texter wanted". On the first page, Google provides some blogs or websites of free copywriters that offer their services as well as agencies that search for copywriters for different areas. When studying these sides however rather the impression suggests itself that here not Texter, but rather customers are looked for and it was much more important to accommodate in the texts on the web page Keywords as often as possible.
Side effect for me: I get to know the sides of my competition with system and discover much, which I would not like to have on my side in such a way. Because website texts, which can hardly be read thanks to an immense number of keywords placed on devils come out, are in my opinion especially for copywriters an absurd thing. And: The Google search should become smarter with every update, reward good content and punish tricks. However, my research gives me a slightly different impression. With a few exceptions, a lot of it seems frivolous and purely ascribed to search engines - with good content, with added value for the reader, that has little to do with.
So this could be exactly the point where I start: To develop better content around my keywords or keyword combinations like "Texter gesucht" and to work out the corresponding traffic.
There is another important aspect of keywords that you should be aware of: What future do the terms that you have chosen or that you would like to choose have? To find that out you don't need a psychic, but again - big surprise - Google. With "Insights for search" Google offers you a kind of trend report for search words.
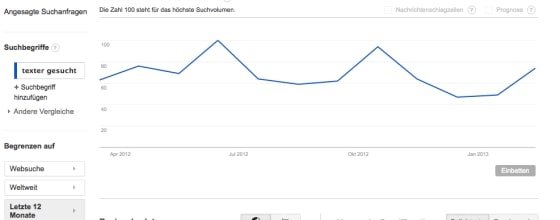
Simply click on a certain term in your keyword list - for simplicity's sake I'll take "Texter wanted" again. The graphic Google gives you shows you the temporal course of interest in the respective term. Theoretically you can also have a look at the regional trends besides the worldwide developments, but unfortunately the search volumes are too small for my niche term. And also the future prognosis falls therefore flatly. Which, however, shows in any case: For "Texter wanted" it's up and down on a low level, but at least never completely down. After all.
If the other terms that come into question are the same, I will of course do the trend check as well. The result is always quite similar. For keywords with higher search volumes it might be possible to gain more knowledge, but the trend analysis also helps me. I can see, for example, that the search also seems to depend on seasonal factors and can adjust my topic weighting in the course of the year.
Good question. To get back to the results of the hit list: Of course, I could do it the same way as some of my competitors and add keywords to the texts for my pages. But as I said, I don't see that as the ideal solution for me, even if the SEO expert will look at me badly for it. So I need a more elegant variant. That means here: "Texter gesucht" is put on the start page, preferably in the title of the page, simply because of its relevance. All other keywords from "texts online" to "SEO texts" to "learn to write" are dealt with via articles, so that they actually fit into the context and do not stand on the page like foreign objects.
The next step on the to-do list is to select a suitable theme for the blog. Once you've installed WordPress, you'll automatically receive free standard Wordpress themes. If you want it to be quite uncomplicated, you can of course also leave this variant out, then you won't have to deal with the selection question at all.
But you can also easily change themes according to your taste. In principle, you can also introduce a theme like a mask, which you can put on your blog again and again. The content remains untouched, only the outside changes. So far at least the theory. In practice there are a lot of details you have to pay attention to - for example not every theme gets along with every plugin.
Especially for WordPress there are a lot of sources and an unmanageable number of themes due to its popularity.
Basically you have to make a decision between free and mostly paid premium themes (some developers also offer one or the other premium theme from their range for free as a bonus).
The big advantage of free themes, of course, is that they cost nothing and can be experimented with accordingly. Just activate a theme on your blog, see if you like it and if not, exchange it for another one.
Nevertheless it is worth it - especially for professional blogs - to invest a few Euros. This starts with the fact that premium themes usually offer more features and are easier to customize. Purchased themes are also maintained regularly and receive updates from their developers. This is important because there are regular updates for WordPress and there is no guarantee that old theme versions will still function smoothly. In addition, blogs are always the target of hackers. Updates can usually appreciate your blog before such attacks.
First address for everyone who prefers a free theme is the corresponding page of WordPress. But there are also many other sites where you can also find them - this blog article will give you an overview. There is also a detailed text about the premium themes here in the checkdomain blog. And here you'll find more tips about designs for small budgets.
From my personal search experience during the last week I would also like to add the tip that also on platforms like etsy designers now offer themes for blogs, partly even connected with the offer to individualize the layout for you - and that for comparatively little money. Just browse under the corresponding search term on the page! The designs for a professional blog were too gambled away for me, but it is definitely another possibility to get alternatives to the standard layouts.
Personally, it helped me a lot in the decision making process to deal intensively with the blogs again, which I particularly appreciate from an optical point of view. Often - for example in the footer area - there is a reference to the theme that was used. I have to collect these blogs on a special Pinterest board to have a better overview of what is important to me, which themes appeal to me the most and also fit my plans.
The decision was a process that dragged on longer. Not because I had problems investing a few Euros for themes, but simply because I had to test what worked for me and what didn't. I first tried some free variations, but quickly reached my limits when it came to customization. So I went on to the premium themes, already with a more precise idea in my head.
Finally I landed at the developers of elmastudio. The selection here is currently limited to about two dozen themes, but I found them all very appealing. Very clear, straightforward and straightforward. Another plus here is the support: A look at the forum of the site gave me the impression that there is really good help here if something doesn't work or there is a special question. It was important to me that there are not only insiders on the road who answer beginners' questions, but that beginners are also taken seriously. Additionally there are video tutorials of the developers in German and English.
Some themes were omitted, because they are meant especially for photography blogs. I then compared the rest with my requirement profile:
The choice finally fell on Waipoua.
As soon as the decision had been made, everything went very quickly: The theme was put into the shopping cart, paid for and within a very short time the download link came. To get the downloaded theme to the blog, go to your Dashboard page and select the option "change the whole theme".
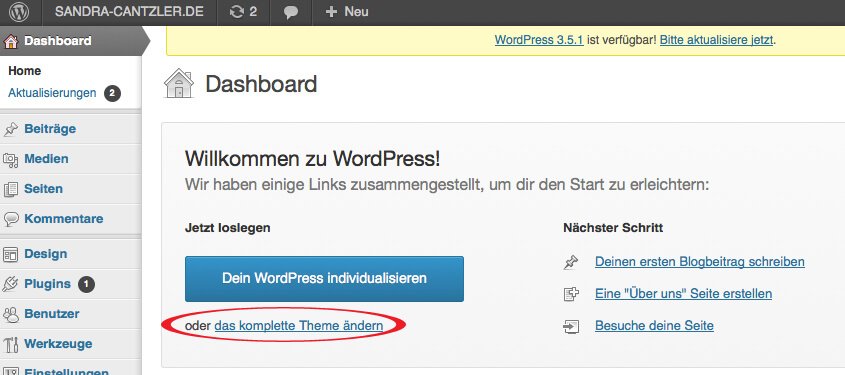
Click and you will be taken to the "Manage Themes" area. Here you change to the tab "Install themes" and go to "Upload".
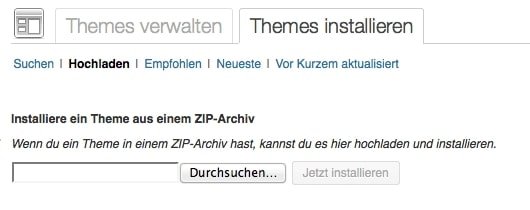
Select the appropriate zip folder, go to "Install" and things will run automatically. After a few seconds your new theme should be "successfully installed". Please activate it and then... juhu, the theme is there.
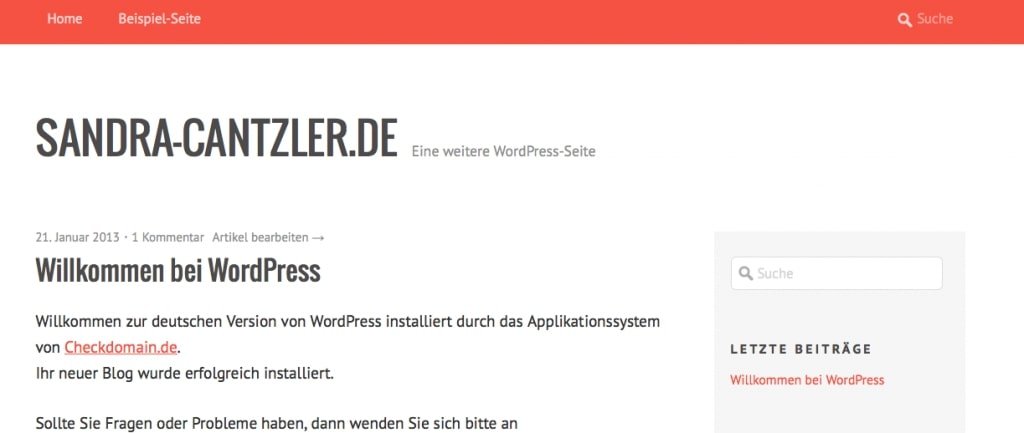
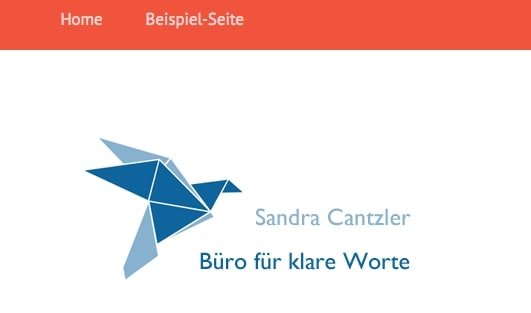
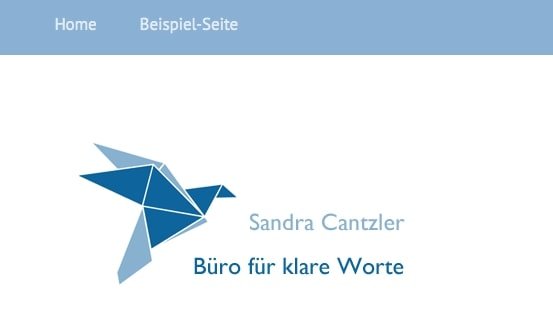
Okay, that doesn't look nearly as good as on the example page - but it can be changed pretty fast. With a nice header, own buttons and plugins for example .
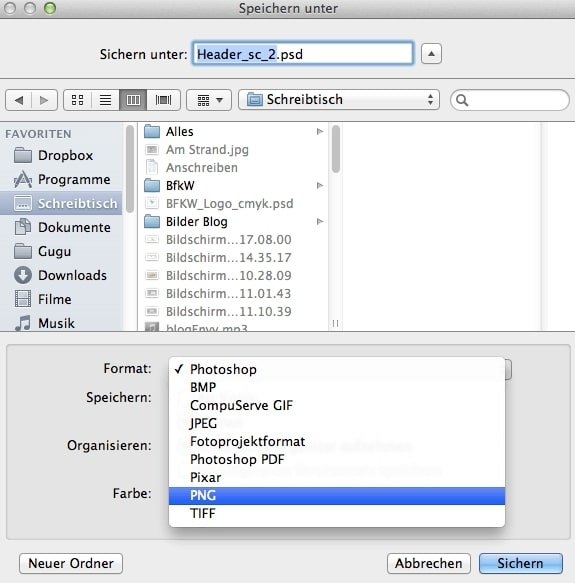
The template I use makes it possible to install my own logo on the site. Which means the other way around: You have to take care of your own logo, otherwise the start page will look very sparse. Practical for me is that I already have a logo that I only have to combine with a suitable font. I did this with Photoshop because I am familiar with this software.
It is important that you know the size that your header should have - the details can be found in the information about the respective theme. With Waipoua the range is quite large, it is worth trying out different variants. If you work here with Photoshop or Photoshop Elements, you first create a new file with the desired pixel dimensions. Important: The background area must be transparent.

Then you upload your logo and assemble it - if necessary - with a matching font.
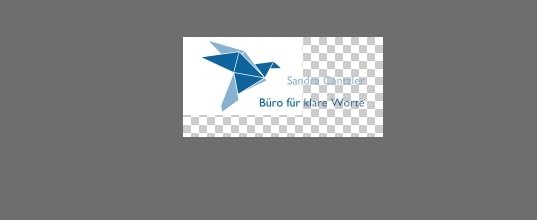
Then save everything, please in the format .png
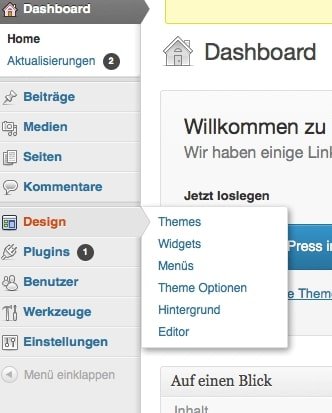
If you have a graphics program, you can probably achieve even more professional results - but I'm quite happy with the result and upload the logo to the blog now. To do this, go to the Dashboard section and click on the Design menu in the left sidebar and then on Themeoptions.
By drag & drop you get the logo from your desktop (or the folder where you saved it) and drag it to the corresponding area. As soon as the image is uploaded, click on Edit to get the URL of the logo image (you can find it in the top right box). Copy the URL and paste it into the corresponding field on the theme options page. Then click on Update at the bottom and you're done.
By default, my theme glows bright orange. Actually it's very pretty, but unfortunately it doesn't match my blue tones at all. Fortunately, this is no problem at all even without a lot of programming knowledge, because it can be easily changed. Also for that you go back to the topic options section. The colors can be adjusted individually via the first two points. You can do this either by feeling and pi times thumb:
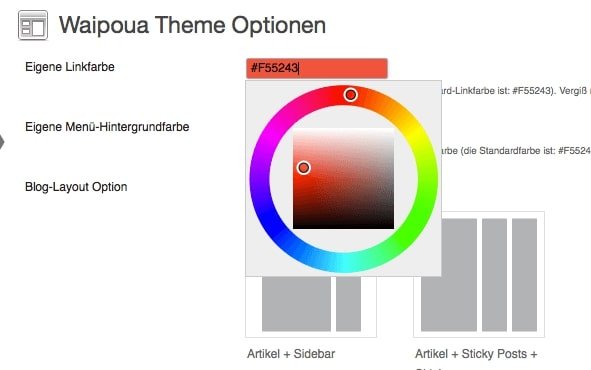
Variant 2 is that you know exactly which color you want - then you can enter it via HTML code. I stick to my logo colours for the links and the menu background colour and enter the corresponding codes directly. Go back to "Apply changes" and be happy about the new colors or just change them if you don't like them.
Tip: If you don't have a plan where you want to go, you can get help and inspiration from the net. There are a number of pages that give an overview of trend colors and show which colors harmonize well with each other. Personally, I often take a look at the Colourlovers community page and at design-seeds, run by colour specialist Jessica Colaluca.
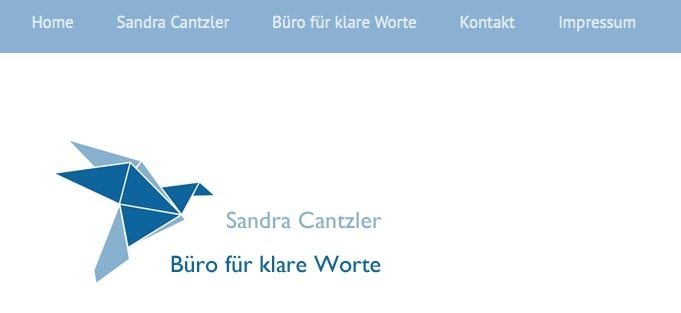
So, optically a lot has changed already now. Only my future readers probably expect more from me than a homepage and an example page. That's why it's again: Click on Dashboard and this time go to "Pages" in the left side column, here select the submenu "Create pages".
First of all, it is of course clever if you think about which pages you want to have at all in addition to the start page. In the checkdomain blog, for example, there is a division by subject area. In other blogs there are points like "about me" or "contact" besides the start page. And then there is also a good findable imprint obligation, in order not to risk any warnings. Apart from the basics that every blog should have, the rest is a matter of taste. Who looks around on other Blogs notices fast that it makes really nearly everyone differently. And that's the great thing about a blog: It belongs to you alone and you can basically do what you want.
Since my site is about a professional project, I definitely need a site that lists my previous references and gives an impression of my work. And then there's a page about me personally and the purpose of this blog.
The creation of a page works with a few clicks: Go to "Create page", a form opens, give the page a name, under the point "Attributes" regulate the order and then click on "Publish". Don't worry, if something goes wrong, it can be corrected afterwards.

All my added pages can now be seen in the menu at the top of the page - plus the sample page I'd like to get rid of. This works with the function "all pages". Click on the corresponding page in the overview and simply move it to the trash.
In the side column of my blog - correctly called Sidebar - you'll find a lot of things I definitely don't (yet) need. For example the points archive, last contributions or last comments. They all just don't make sense with a completely new blog. That's why I'm going to do a little cleaning up for now.
To get rid of the superfluous elements, go to Design in the left sidebar of your dashboard and click on Widgets here. In the middle of the page you can see which widgets are already pre-installed. In the box on the right you can see which widgets are currently active. To remove them from the sidebar, simply drag the respective element into the "Inactive widgets" field at the bottom of the page.
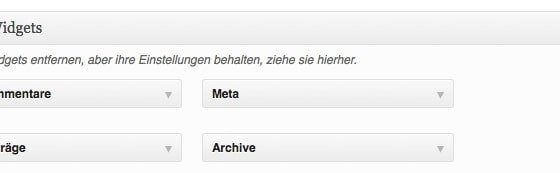
Conversely, the desired elements are dragged from the widget palette into the sidebar box. In my case, I get the text element and the page element. The text element allows you to put your own small text in the page column, which can always be seen by your users (for example a very short about text). You can or should give all elements a name. If you can't think of one right away: No problem - you can also set up the sidebar first and then go to the fine-tuning.
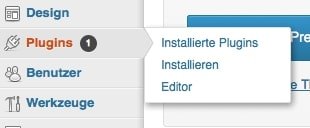
There are quite a few widgets pre-installed in the template I used - but for WordPress blogs there are many, many more. You can find them on the WordPress page in the Plugins section. Here you can choose from more than 38 000 of these practical helpers.
But beware: Not every plugin is compatible with every template. Read the information in the description of your template thoroughly - this can save you a lot of time and work. Maybe you can also take a look at the respective forums to find out which plugins you should keep your hands off.
Second, too many plugins make your site a lame duck. The technical gimmicks can be at the expense of the loading time of your blog. If readers wait a lifetime for something to happen, it's bad for you - because there's a high probability that users will jump off and read on somewhere else!
I just want to install an additional plugin first: An image widget that allows me to place a photo in the sidebar. There are 16 hits for the search term "image widget". At the moment I only need a very simple variant, but there are also widgets with a nice slider function. It is definitely worthwhile to take a closer look at the different plugins and try them out.
Once you have decided, simply download the corresponding plugin. Then you go in the Dashboard into the area Plugins and there on "Install" and "Upload". Now simply browse the computer for the appropriate zip file, upload it and finally activate it.
So, everything's done - my Image Widget is now found together with all other widgets in the corresponding area and I just have to drag it into the sidebar. The next step is to open the widget, upload a picture and title it appropriately. You can also decide, for example, in which size the image should appear in the sidebar. Save, ready!
There are things that simply belong to a blog today - such as the social media buttons through which readers can connect to you on social networks with just one click. If you use a ready-made template for your blog, the installation of these buttons is usually done very quickly. Most of the time there is a widget for it - in my case, too.
To use it, I go to the widget area in the dashboard, open the "Widget Area Header" on the right side of the page and drag the "Social Links Widget" from my widget palette into the header box. It opens a long list of networks, beside the usual suspects like Facebook, Twitter and Pinterest also some more unusual candidates. If you like, you can enter the corresponding URL for each network you use. For me that's just four at the moment, I'd rather leave out the services I've neglected...
Mmmh, looks like a lot of white - too much white. That's why I'll definitely reduce the header a bit, so that there's less free space. And I will definitely look for social media buttons that match the rest of my layout better.
An area that is too often forgotten: The footer. You can also place some information or menu items you don't want on top of the page in a more inconspicuous place. With my template, I have to go to the Dashboard in the menu area and select the box with the footer navigation. The navigation still needs a name. You can drag elements into the menu again. If you start, only the contact page and the imprint page will land in the footer, later more - a lot of fine-tuning is necessary here as well.
Theme installed, layout adapted, pages set up - now it's time for the first content. This includes mandatory elements like the imprint and standards like the "About me" page and a short welcome text on the start page. You know everything from other blogs. And nevertheless it becomes difficult, if it suddenly concerns you or your own projects.
While the legal requirements clearly regulate what the imprint should look like (and who needs such a detailed imprint), bloggers otherwise enjoy a great deal of freedom. This also applies to the biographical information about yourself. They can be short and concise, detailed, factual, funny... The main thing is that you write something about yourself - because as a blog reader you also want to know who is behind the stories, don't you?
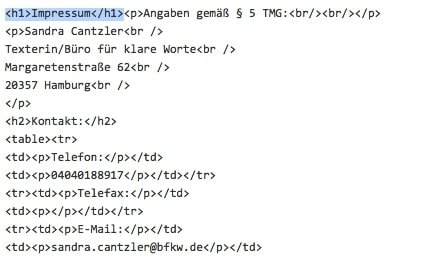
If you look around in the blog world, the imprint on many pages is still a rather rudimentary matter. This can be obvious, especially if your blog serves professional purposes - as it does for me. A complete imprint, which is individually created for your blog, is mandatory. Whereby individually does not mean that you must assign a lawyer with it. Fortunately, there are imprint generators on the net, such as e-recht24's, impressum-generator's or it-recht-kanzlei's imprint generators.

The procedure is similar in all cases. I'll show you how it works via the e-recht24 generator. You will find the corresponding link on the start page. Click on it, read through the information and then click on "Create imprint". Afterwards you will be guided step by step through the creation, where each step is explained in detail.
Among other things, you must indicate who is the operator of the site, a complete address, as an independent your sales tax identification number... After five minutes at the latest, the imprint will be created. Important: When using such free offers, the author (in this case e-recht24) must be named (or vice versa: You may not simply delete the references to the author in the imprint).
The generator displays the finished imprint. To get it to the blog, just scroll down and copy the source code. Then go to the imprint page in the blog, change the command line from "visual" to "text" and insert the source code. Update now, then the imprint will appear on the corresponding page. Tip: Since I have named my page Impressum, there are now two Impressums below each other. Either I can now delete the page name or I delete the corresponding command in the source code:
My job is to write texts. And I don't have any problems portraying other people: What makes people different? What can he do? What does he want? Why does he do a certain thing? But to tell about myself on my "about me" page? Pretty difficult. You don't want to appear vain, but of course you don't want to be boring. Only: What does the middle ground look like?
At this point it's all about for the first time that a blog should not only look good with the blogger, but also the content and the language. Ideally, the result should be a clear, individual style that distinguishes one's blog from all others.
In her book Blog INC., blogger Joy Deanddeelert Cho distinguishes between personal and topic-based or professional blogs. The more personal the blog, the looser the language can be. Professional blogs, on the other hand, are expected to present themselves seriously. The biography for a personal blog should be written in the first person, for a professional blog in the third person. In addition to the biographical information, information on inspiration and the content of the blog is also interesting for the reader.
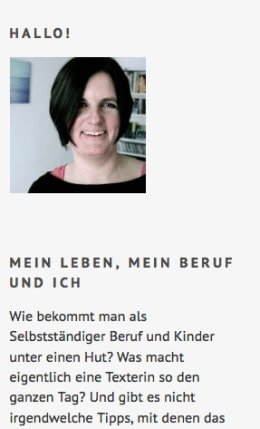
It is crucial to see the About page from the reader's perspective, as it says on unternehmer.de: "What benefits/benefits do my readers have from my blog? Why should clients hire me? What advantages can I offer that competitors don't have? The site should not consist of barren key points, but should not get lost in details. Plus: A photo so that users can get an idea of who is writing here..
This is exactly where I would like to start for my texts about me: My blog should show what I can do professionally and what I have done so far, but it should also give an impression of how I work and what I am like. I would like to convey this in the standard texts if possible. Not crazy, but also not 08/15. Beside the longer ßÜber mich page there should also be a short info on the start page, quasi as a greeting. Since my blog is not only about me, but also about my office, it gets its own biography on its own page.
Points, which from my point of view have to be mentioned:
In addition to the text about me, I have created three subpages - with a classic CV, my references and 20 facts about me, in which there are also some private things to learn. All in all, I spent several days on these texts (even if they are rather short). A whole series of versions flew into the barrel until I ended up with this version. I'm satisfied with that for the moment, but of course there's always air to the top. Now it's time for the first lyrics for my blog!