WordPress is by far the most popular CMS on the Internet. Worldwide about 30 percent of all websites are operated with WordPress. This popularity also makes the system a preferred target for hackers. They often have an easy time of it: according to estimates, about 75 percent of all WordPress installations have security gaps. This is due to carelessness in programming, especially of templates and plug-ins, but also to the convenience of many users who do not update often enough.
Second disadvantage of the great popularity: The WordPress makers want or have to meet the requirements of more and more people - this makes the system slow and leads to long loading times of the website. Today we show you a simple method to solve both problems within a few minutes. Let's go!
In our tutorial we show you how to turn your WordPress blog into a static page. Or put differently: How to "hide" WordPress and protect your site from attacks. If you log in to WordPress and for example create a new post, then WordPress stores all information in database tables. The content of the post comes in one table, the author comes in another, the URL is written in a table and so on. As soon as a visitor in the blog calls the post, the necessary information from all tables is searched together again and the page is dynamically generated.
The complete WordPress system always runs in the background. The result: the page becomes attackable and slow. The solution: You generate all pages and posts and save them ready assembled - static - on the server. And then your WordPress switches off or hides it.
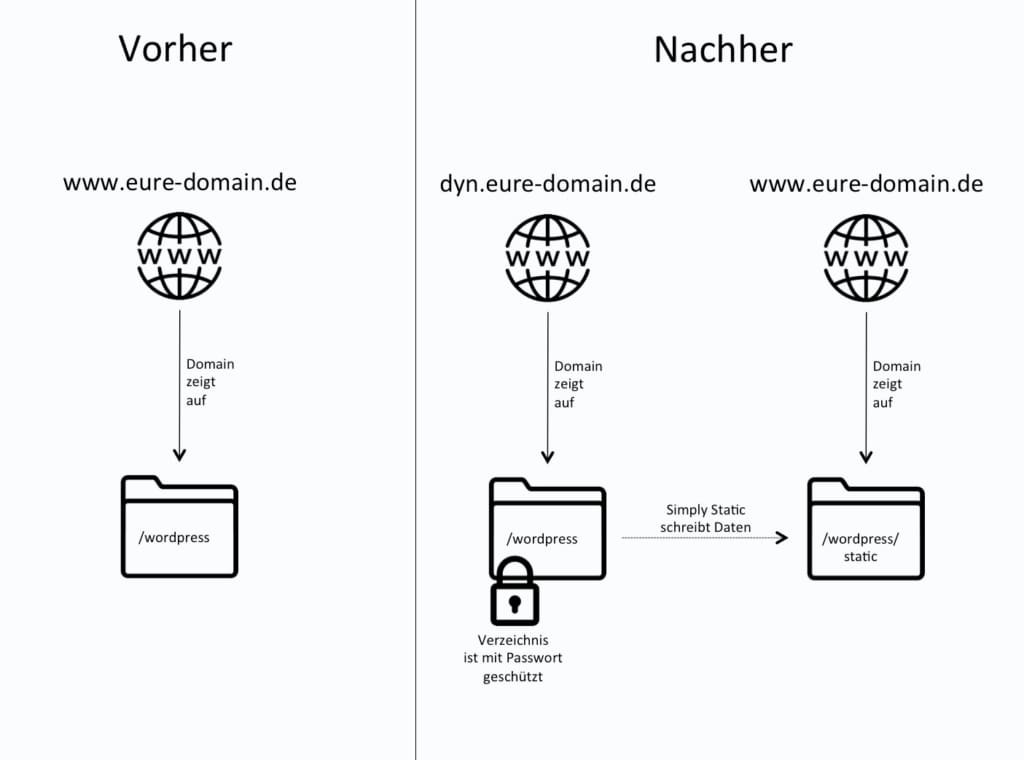
First create a subdomain for your domain, like dyn.eure-domain.de. As a checkdomain customer you will find detailed instructions in our help section. Let the new subdomain point to your WordPress directory, i.e. exactly the directory your main domain points to.
In your WordPress directory on the server a subfolder must be created now. The static version of your page will be stored in this subfolder later on - for example the folder name "static" would be useful.
To create the subfolder you need FTP access to your webspace. If you have forgotten your access data, you will find the instructions for assigning a new password here. Important for checkdomain customers: If you have created several FTP users in your account, please use the access data for the main user, otherwise problems will occur in later steps.
Using an FTP program such as FileZilla, you can connect to the server and go to the directory of your WordPress installation. Create the new subfolder "static" in this directory. Important for checkdomain customers: The directory "static" must be a subfolder in your WordPress directory.
In the next step you change the directory your main domain points to to the directory "/static". To do this, select the Domains tab in the checkdomain customer area, then Configuration and then Domain forwarding. Click on the Forwarding option and select the subfolder "/static" that has just been created via FTP under Directory.
For even more performance and security you can now deactivate the execution of PHP for your main domain. As a checkdomain customer you select your webhosting package, click on Settings under Server, select your domain in the drop-down menu and select PHP Version.
So that our dynamic WordPress blog, which can now be found under dyn.eure-domain.de, can no longer be reached without a password, it will be provided with directory protection. As a checkdomain customer you choose your webhosting package again and click on Directory protection under Security. Select your domain there and click on New Directory Protection. Now select your WordPress directory and follow the instructions on the page.
Alternatively you can set up the directory protection directly in the .htaccess. Instructions can be found here.
If you call up your main domain now, you will see: Access only with password. The problem is that the directory protection is "inherited" downwards and thus also applies to the "static" folder to which your domain now points. Of course we have to change that, because in the future the static page should be accessible for all users.
Two .htaccess files have to be edited. Use your FTP program and open the automatically created .htaccess file in your WordPress directory. Add the entry 'require local' here. The whole thing should look like this:
# BEGIN WordPress
RewriteEngine On
RewriteBase /
RewriteRule ^index\.php$ - [L] RwriteCond %
{REQUEST_FILENAME} !-f
RwriteCond %{REQUEST_FILENAME} !-d
RewriteRule . index\.php [L]
# END WordPress
AuthType Basic
AuthUserFile"/home/euer-user/wordpress/passwd"
AuthGroupFile"/home/euer-user/wordpress/group"
AuthName "authname"
require valid-user
require local
In the directory "static" add a file with the name
.htaccess and enter the following line:
Require all granted
Now log into the admin area of your WP-Blog and install the plugin "Simply Static". Note: The admin area can now be found at dyn.eure-domain.de/wp-admin. After activation the plugin appears as a new menu item in the sidebar.
In Simply Static, click on Settings and specify the address where your static blog should be available - in our example http(s)://www.eure-domain.de.
Then go one point further down to the point Delivery method and select Local directory. Enter the path to the already created "static" directory. This should look like "/home/euer-user/wordpress/static".
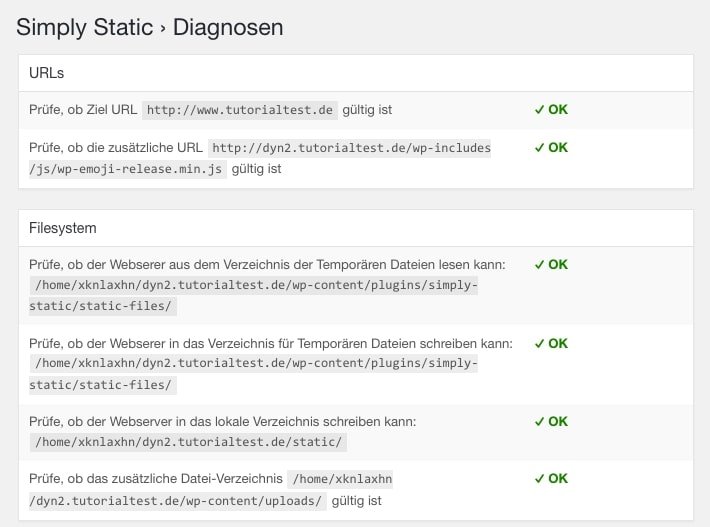
Simply Static helps you with the point Diagnostics to check if all settings and prerequisites are correct. Everything all right? Then you can create your static blog with the button "Generate static files" in the main menu of Simply Static. Done!
Your WordPress page is now safe from attacks and virtually immune to security vulnerabilities in plugins and Co.
The website will be delivered very fast: The loading time is only a fraction of the time otherwise needed, since no more data from the database must be retrieved
The static content has to be regenerated after every change - even if only a spelling error has been corrected, the whole blog will be regenerated. For large blogs that have a lot of content, this can take some time.
Creating static pages using Simply Static is best suited for operators of small to medium-sized websites that are seldom changed. Simply Static reduces the risk of hacker attacks to almost zero - even if WordPress updates are neglected. A bonus is the fast delivery. This procedure is recommended for most operators of WordPress pages.
A tip for advanced users: WordPress doesn't have to be accessible online anymore with this model, not even behind password protection. It can also run locally and generate the static data from there. Instructions can be found here.