We have already shown you in this blog how easy it is to format and structure your blog articles as a WordPress user. This is made possible by the visual text editor of WordPress, which works according to the WYSIWYG system: What You See Is What You Get. In this article we go into detail and introduce you to the visual text editor in detail.
The text editor allows a largely intuitive design and editing of your texts. This text provides you with information and instructions:
WYSIWYG is also called Rich Editing. Simply put, it means that your text is formatted by the rich editor as you type it. The rich editor creates HTML code in the background (HTML stands for Hypertext Markup Language - a programming language that can be used to create documents for the web). For you, this means that you can concentrate fully on writing and don't have to worry about technology.
Tip: If you want to know what's going on in the background, change your editor from "Visual" to "Text" (the corresponding buttons can be found at the top right of the text box).
The toolbar is located above the text input box and comprises two lines. If you only see one line, click on the keyboard-like icon, Hide Toolbar/Indicate Toolbar - the second line folds out.
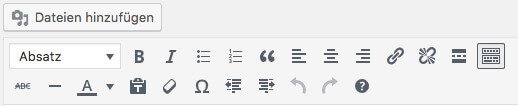
Which icon stands for which function? With our overview all questions will be answered:
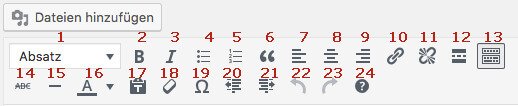
You will probably use the two enumeration icons relatively often. Because lists are an important stylistic tool for web texts. They help you to structure a text clearly and make it easy for quick readers to grasp.
As with a word processing program, you should also use the icons provided in WordPress - if you use dashes instead, it might look okay in the editor. At the latest, however, when you publish, you will notice that text passages can slip
With version 4.7, the formatting symbol for the popular justification has disappeared. Of course, the function hasn't. There are currently several ways to format paragraphs in justification:
<p
											style="text-align: justify;">
If you decide to use justification, you have to watch out for one thing: There is no hyphenation available in WordPress. In justification there can therefore be very large gaps between the individual words, which doesn't really look good and can be at the expense of legibility.
Moving images are becoming an increasingly important element for blogs. As a WordPress user you have the possibility to embed videos from different platforms in your blog. For example, you can go to YouTube, find the video you want and then click the "Share" button:
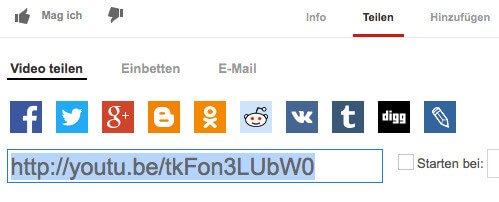
If you insert this link into your text editor, the video will automatically be included.
With keyboard shortcuts, formatting often works faster than with the mouse - at least as soon as you have memorized the shortcuts completely. Also for all functions of the visual editor there are such fast handles.
For example, you can create headlines with the combinations ctrl or cmd (for Macs) plus 1, 2 or 3.
With strg/cmd plus c you copy, with plus b you bold, with plus z you revoke. You can get a complete overview of all abbreviations via the help icon in the editor under the question mark.
So you have got to know the visual text editor and its most important functions. I hope the information will help you and make writing easier. If you still have questions, feel free to contact us - we are looking forward to your suggestions!
With our ranking coach you are able to perform SEO for WordPress easily and quickly.
We are pleased if we could arouse your interest in WordPress. The following list contains some links to get started with your WordPress page: