Blogging is easy. But sometimes it's quite confusing. For example when it comes to pages, categories and articles. Theoretically the classification is actually clear - but in blog practice some things are handled very flexibly. As a beginner, little can begin with terms such as parent page, subordinate and superior. With this contribution we want to provide for clarity and answer the most important questions approximately around sides, categories and articles.
All tips and explanations refer to blogs operated with WordPress, since this blog software is currently the most widely used and is also used by us for the checkdomain blog. However, other systems work in very similar structures.
Pages are the big constants in a blog. Once set up, they are usually no longer changed large or updated automatically - because pages are static. A good example is the imprint page.
You create pages in the dashboard of your blog using the "Pages" tab. As soon as you have finished a new page, it appears as a button in your main navigation, mostly in the header or/and in the sidebar. But sometimes the footer is used as well.
You can subordinate several subpages to one main page. To do this, open the drop-down menu in the right column of the Dashboard:
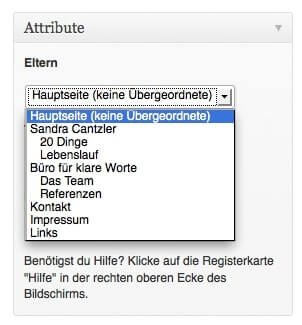
The main page then becomes the so-called parent page. Of course, you can also subordinate other pages to a subordinate page. But don't get too bifurcated: the clearer and easier the navigation, the easier it is for your users...
Articles are the heart and main content of any blog. They provide what makes a blog: articles bring dynamism into the game. Each time you post a new article, it appears on the home page of your blog at the top of the article order. The older articles slide down one position.
Basically, blog articles appear in a reverse chronology - the most recent texts always appear first, as they are considered the most relevant. However, WordPress also offers the possibility of so-called "sticky posts" by default. With this feature, from your point of view, particularly important/popular/readable articles always remain at the top of the home page. In the checkdomain blog, for example, the "Five things you should know about the new Top Level Domains" currently hold this position.
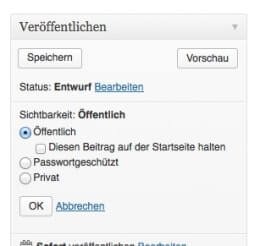
The Sticky Post feature is not easy to find: If you want to pin an article to the top, you have to go to "Visibility" in the publishing input mask and click on "Edit". Then check the box "Keep this post on the homepage".
Unlike static pages, dynamic articles are linked to the RSS feed of your blog. This means that as soon as something new happens, your followers will be informed and can read, comment and discuss your latest post. For the latter to work, you should give articles sharing buttons (for Facebook and Twitter, for example) - so the conversation can continue on social networks.
In addition, you can assign keywords to each article - the most important keywords to your text. A few years ago, these keywords were popular in tag clouds in the sidebar. This trend is now a thing of the past, but the keywords remain very important for the searchability of an article.
You should pack each article into one or more suitable drawers. In blogs these drawers are called categories. You can find this article in the checkdomain blog, for example in the category Blogging.
Categories are usually displayed in the sidebar. However, it can also happen that categories are displayed as a page. Or to formulate it precisely: All articles that have been assigned to a category appear on one page - you can see what this looks like in our header navigation.
Our idea behind it: We want to offer our readers the shortest possible routes to the topics they are looking for.
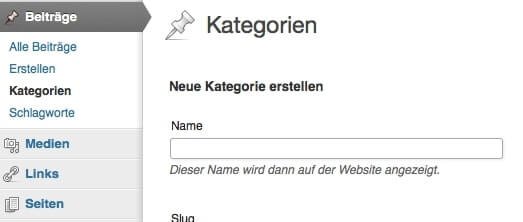
You can easily set up this form of navigation via the dashboard of your blog. First go to posts and create the desired category: :
Then go to the "Menus" area and scroll down to the category window. Click here on "show all".
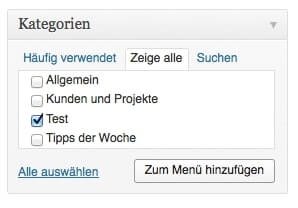
Add the selected category to the menu and don't forget to save the changes in the menu.
Result: The category you just created appears as a page in the navigation area of your blog. New articles in this category will appear on both the home page and the category page.
We hope this article has given you some guidance. If you're looking for more information about the blog start: In our category Blogging you'll find tips and inspiration on a wide variety of topics, from suitable names for blogs to software and image sources. Otherwise, we're always happy to receive feedback - your questions and suggestions are important to us!
We are pleased if we could arouse your interest in WordPress. The following list contains some links to get started with your WordPress page: