WordPress is not the same as WordPress. For the start in the blogger life many decide first of all for the free platform WordPress.com. But restrictions, for example in terms of storage space, design and advertising placements, often lead to bloggers feeling restricted in their freedom over time.
If the blog has grown out of its infancy, a switch to WordPress.org and thus to a self-hosted site is a good idea. Hosting a website yourself is no longer a complicated science. You should be willing to put a little more money, time and effort into your new web project - but you definitely don't have to be afraid of the technical effort associated with hosting. In this article we explain step by step how to move your WordPess.com page to WordPress.org and thus to your own domain.
Many web hosters today, for example, offer convenient possibilities with so-called 1-Click installations to set up a self-hosted WordPress page directly via the user account - without much technical knowledge and FTP upload, you are ready to go within a few minutes.
Checklist: What to do?
In the video we have explained the first four of the following steps in fast motion. The detailed instructions can be found below.
Once the preparations have been completed, the implementation is underway. In the first step you have to export all data from your "old" WordPress page and save it on your PC
Log in to WordPress.com, choose Settings in the backend and click on Export data. On a new page you can now choose whether you want to export all contents (recommended) or only individual contributions. You can download the .xml file directly from the backend or via the link in the email that was sent to your address.
If you want to take the opportunity and give your blog a new look with the move, you can install a new theme. If you are still satisfied, you should install the previously used theme before importing the data. Look at WordPress.com under the menu item Themes, which you are currently using. Most themes are also available for download at WordPress.org.
That's probably the step most people are afraid of. Take a deep breath, it's not that hard..
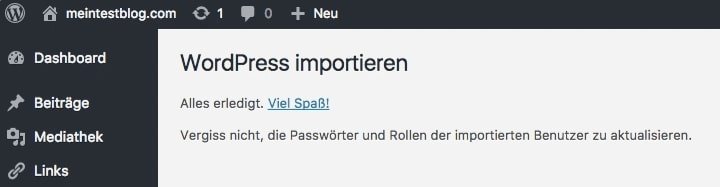
Drive in the new WordPress installation via the menu item Tools and select Import data. Some other blog systems are listed here. For WordPress the installation of the plugin WordPress Importer is necessary. With one click you install it and then click on Run Importer. Here you only have to upload your previously downloaded export XML file, check the box Import attachments and send the request.
The more content, the longer the import will take - so you have to be patient. Afterwards your screen should look like this at best:
Now click through front- and backend and see if your content and media have been taken over completely and correctly and how they work with the (new) theme.
Possibly not all pictures were transferred correctly. WordPress imports some pictures unfortunately only into the individual contributions, but not into your Mediathek. Install the Plugin Attachment Importer, download your XML file and enjoy a filled media library.
Don't take this step too fast. Take enough time to set up the new blog and change the design. If you are happy and have a good feeling, it's time to complete the WordPress move and take your users to the new WordPress page. There are two ways to do this: The complete redirection or the passive retransmission.
The redirection service can be activated quickly and easily via the menu item Settings in the WordPress.com backend - but WordPress.com can pay 13.00€/year for this service. This annual investment is recommended for a blog that has already built up a good visibility on Google.
In principle, it is not recommended to delete the blog completely. Tedious link building would be completely obsolete. Instead, we recommend the passive and free continued operation. So that Google does not punish your contributions, which would be to be found now consequently on the old and new Blog, as Duplicate content, you must edit the contributions on the old Blog. In each post, teasers the topic briefly and then sets a link to exactly this post - but in the new blog.
Also post a "farewell post" on the old blog by announcing the move to the new blog.
After moving to a new domain, internal links in your texts will no longer work because the URL has changed. Changing all links manually is time-consuming - the free plugin Velvet Blues Update URLs can help. After the activation you have to enter the old and the new URL of your website and check the box URLS in page context. After confirmation all URLs will be adjusted automatically.
Have you thought of everything? Our checklist shows you at a glance what to do.
With our ranking coach you are able to perform SEO for WordPress easily and quickly
We are pleased if we could arouse your interest in WordPress. The following list contains some links to get started with your WordPress page: