Moving to a new server with WordPress can have various reasons - such as a change of provider or insufficient server capacity. The WordPress move can be done manually or with the help of a plugin. In this article we explain step-by-step the manual WordPress server migration and introduce you to Duplicator, a free migration plugin.
Of course, you can also use the instructions for your online shop or other content management systems. Then you only have to consider that the configuration file has a different name and if necessary other/additional entries in the database have to be adapted.
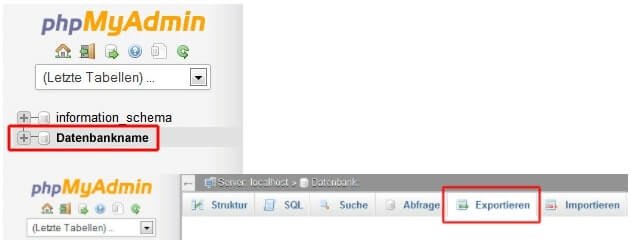
To keep your database up to date, you should start by backing up your current database. Smaller websites can use phpmyAdmin to do this. Most webhosters have this software integrated.
Since the server timeout of phpMyAdmin already takes 60 seconds and this leads to problems with larger amounts of data, larger sites should use the mySQLDumper to export their data.
To save the WordPress files and for the move you need an FTP client, e.g. FileZilla. You can download it for free.
Both the database statuses and the FTP data are saved locally on your PC. Save them directly to a place that you can easily reconstruct - for example on your desktop or in your own move folder.
To do this, connect via FTP to the server on which your WordPress installation is located. You can find out how to set up FTP access at checkdomain in the video.
Mark all folders and files of WordPress in your data so that they are highlighted in blue. Now right click on one of the displayed files, select "Download" and wait until the process is completed.

... with phpMyAdmin
... with mySQLDumper
... with
phpMyAdmin
You can keep the default export settings. With a click on Okay you confirm that the SQL file should be saved on your PC.
After the download, first upload the unzipped folder of the mySQLDumper via FTP to a new hosting directory.
Call the path where you uploaded the folder (e.g. http://EureDomain.de/msd/) in your browser. You will now see an installation interface of MySQLDumper. In the first step select the desired language and confirm with a click on "Installation".
Enter the username and password of your MySQL database in the installation mask. Then click on "Connect to MySQL". If the connection to the database was successful, confirm with "save and continue installation". If you get an error message, check your access data and add the database name if necessary.
The installation is now finished and you get the main menu of the MySQLDumper displayed and you can start exporting the database. Select your database in the left column in the pulldown menu below and click on "Backup".
Now you can click on "Start new backup" in the right column. After the message that the backup was successful, select "Administration" in the left menu. In the backup overview, click the icon in the "gz" column to download the packed SQL file to your PC.
Then delete the MySQLDumper folder from your web hosting using an FTP program.
If you change the webhoster, you have to create an FTP access there. Important: You must set up a new database in any case - regardless of whether your provider changes or not. Make a note of all new access data so that you don't get confused later.
This step adjusts the database information in the WordPress configuration file. The file wp-config.php is located in the root directory of the downloaded backup. Open it with your text editor.
Enter your new database name, user, password and if necessary the database host at the places marked in the picture - if this differs from "localhost" and save the file afterwards. Important: Make sure that you keep the quotation marks.

Connect to your new web server via FTP and upload the WordPress files and folders saved on your PC to the root directory there.
Select all folders and files of WordPress in the left window of FileZilla so that they are highlighted in blue. Now right click on one of the displayed files and select "Upload". Wait until the process is finished.
Now the SQL file must be imported into your new database. Depending on which software you use, there are different import steps. Make sure that you have created a new database before starting the import:
Log in to the new server via phpMyAdmin and select the database in the left column. In this step click on "Import" in the upper menu bar. Next, click "Browse" to select the SQL file of the database on your PC. In the lower part you leave the settings at the default values and just click on "Ok". The SQL file will now be imported. ... with mySQLDumper Loads mySQLDumper first via FTP to your new server analogous to the instructions in step 1 and follows the installation steps already described. In the main menu, select your database again in the pull-down menu at the bottom left and then click on "Administration". In the administration interface, click on "Browse" in the lower area to select the sql.gz file from your PC. Then select "Upload file" to transfer the file back to the MySQLDumper. Now select "Recovery" from the main menu on the left side. Your database will now be listed in the recovery overview. To import the data, click on the database name and you will be taken to a new overview where you have to select the desired database.
If you want your WordPress installation to be accessible under a new domain in the future, you must adapt this directly in the SWL file.
You can change the entries in the SQL file via phpMyAdmin. Logged into phpMyAdmin, select your database on the left side and open the table "wp_options". In the table you have to change the entries for "siteurl" and "home".
In the table you have to adjust the entries for your SiteURL and Home.
Example: On your old server WordPress was stored in a subfolder. But on your new server you want to have a direct access to the blog. Change the information from e.g. "www.yourDomain.com/blog/" to "www.yourDomain.com/".
After moving to a new domain, internal links in your texts will no longer work because the URL has changed. Changing all links manually is time-consuming - the free plugin Velvet Blues Update URLs can help. After the activation you have to enter the old and the new URL of your website and check the box URLS in page context. After confirmation all URLs will be adjusted automatically.
Sometimes it is necessary to adjust server paths and site urls in the database. You can do this easily in text editors or use the Search & Replace plugin for WordPress.
Once you have completed all the steps, your page is now available on the new server and you can log into the backend of WordPress as usual to edit your page.
Many users would not dare to move to WordPress manually because they are not so familiar with the associated technology. As for almost everything, there are a number of free plugins that take over the server relocation of WordPress. If you decide on a plugin, you should still make a backup of your WordPress files before starting the move.
We recommend the free plugin All-in-One WP Migration for the automatic WordPress migration.
The plugin also serves as an additional backup option beyond the actual relocation function. A great video tutorial on how to migrate WordPress using All-in-One WP Migration can be found here.
Both have their advantages. If you're not so tech-savvy, a plugin like All-in-One WP Migration will help you with the move and take over the difficult parts automatically.
However, if you have the confidence and/or motivation to deal with the topic, we clearly recommend the manual WordPress migration. In case of an error you can reconstruct here exactly which steps you have carried out last and thus limit and simplify the troubleshooting.
Would you like to move your WordPress blog to us? Then use the checkdomain coupon and save 5 € with your first order.
We are pleased if we could arouse your interest in WordPress. The following list contains some links to get started with your WordPress page: