The first question that comes up when the terms HTTPS or SSL are used is: What is it and what do I need it for? I would like to answer these questions for you below and also show you how you can switch your WordPress website or blog to a secure HTTPS connection using an SSL certificate..
SSL (Secure Sockets Layer) is an encryption protocol for secure data transmission. Whereby SSL the more extensive is a well-known name, it has been used by the so called TLS (Transport Layer Security). The procedure is therefore used under the term TLS, but basically means the same thing. The so-called "SSL certificate" is a digital certificate to confirm the public identity of the holder. In the you install such a certificate on your web server, you put you're the cornerstone of an encrypted connection.
The so-called HTTP (Hypertext Transfer Protocol) is used to the data between the browser and the Internet since the beginning of the Internet. to the web server. With HTTP, however, this happened unencrypted. In the age of free WLAN hotspots the need for encrypted data transmission, because Until then, it was possible for computer-savvy people to use the data transmitted over such a freely accessible hotspot, and use it for abusive purposes. For example, passwords and usernames could be logged via the HTTP can be recorded. This is also possible with HTTPS, however, this data is encrypted there and it would take months without the correct key to read this data. Whether a connection is secure or not, you can recognize it by the "lock" next to the address line of your Browser and at the "https://" short at the beginning of a URL.
In order to install the SSL certificate on your server, you must you log into your customer account at your hoster. This may vary from hoster to hoster. For checkdomain you will find here a detailed instruction.
Did you get the SSL certificate from your host for your domain? is installed, the next step follows. To force the connection to the WordPress Admin area via HTTPS you first need to establish an FTP connection (e.g. with FileZilla) to your webspace and then edit the so-called "wp-config.php".
If you are editing this file for the first time, it makes sense to add a comment at the end of the document, so that you know that these are changes made by you. This could look like this:
/* Customization - HTTPS/SSL */
Now we come to the actual command, which reads as follows:
define('FORCE_SSL_ADMIN', true);
This one-liner is used for an encrypted connection at forced access to the admin area and you can enter your user data safely and with a clear conscience.
Now that the certificate has been installed on the server and the you have changed the admin area, it is time to change the WordPress and website address. To do this, log into your WordPress Admin area and click on Settings -> General in the navigation on the left side..
 Permalinks". WordPress then
automatically takes over the HTTPS configuration for all
permalinks..
Permalinks". WordPress then
automatically takes over the HTTPS configuration for all
permalinks..
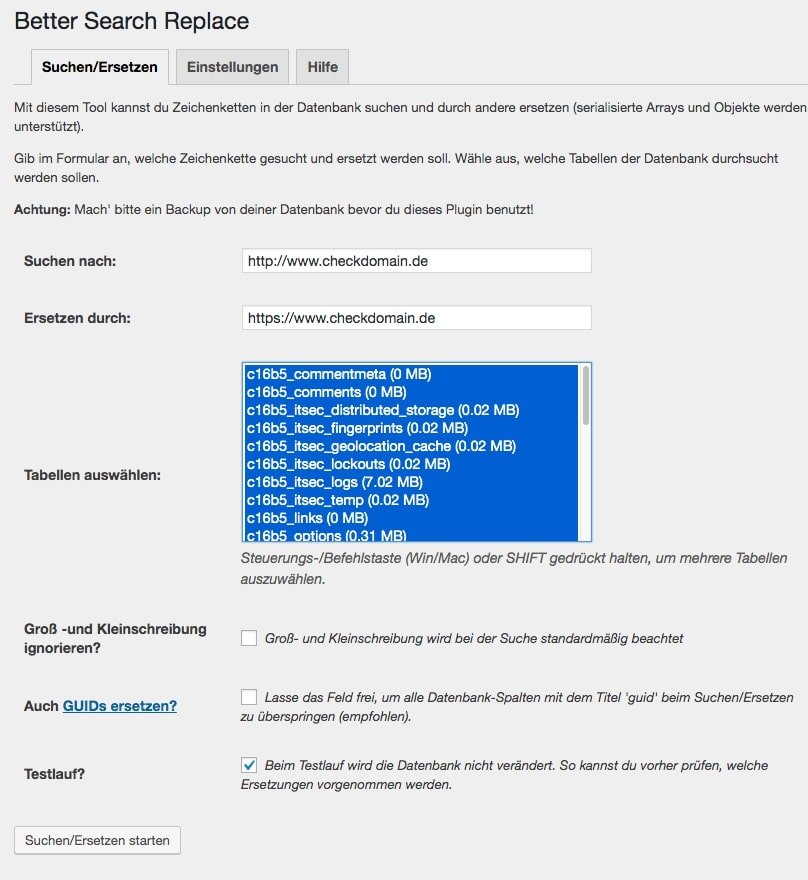
Besseres Suchen und Ersetzen (externer Link) ist ein kleines aber feines Plugin, das die WordPress-Installation für HTTP-URLs durchsuchen und durch HTTPS-URLs ersetzen kann.
Unfortunately, it is not enough to update only the permalinks, because all links from contributions and sides are not yet affected by it. To give these links the necessary HTTPS charm it is necessary to replace HTTP with HTTPS. It would be possible to do this manually, but it would take a lot of time..
This is necessary to avoid a so-called "mixed content" warning. This is caused by browsers when there is content on a page that is retrieved via HTTP, i.e. an insecure connection, and via HTTPS. This would not only be bad for your Google Ranking but could also affect the confidence of the readers.
Before you start the whole process you should first create a backup . Now you install the plugin via your WordPress-Admin interface. Once you have done this, you can access it via "Tools -> Better Search Replace". In the following picture you can see a screenshot of the plugin.
Now simply write your domain in the "search for" field with "http://eure-domain.de" and in the "Replace with" field your domain with "https://eure-domain.de" and then click on "Search/Replace". Depending on the size of your website this may take a few seconds.
When replacing with Better Search Replace you should not only replace "http" with "https" (without your URL), because this could also affect outgoing links or externally referenced images or similar. Not all pages have switched to HTTPS yet and this could end in a fiasco.
Now you've almost made it. About the so-called .htaccess file you have to set up an automatic redirection now.
This function ensures that a call via HTTP is automatically forwarded to the same page using the HTTPS protocol. If, for example, you have positioned an old backlink (http://xyz.de) in an old guest article on another page, the reader will be redirected to the same article as before when clicking on this link, but this time using the encrypted link.
For the whole thing to work, you need to access your web server again via FTP client (e.g. FileZilla). On the same level as the "wp-config.php" there is also the .htaccess file. Now you have to download it and edit it with a suitable editor (I recommend Notepad++, but any other editor also works).
If you have opened the file in the editor, insert the following lines at the beginning of the document:
RewriteEngine On
RewriteCond %{HTTPS} !=on
RewriteRule ^ https://%{HTTP_HOST}%{REQUEST_URI} [L,R=301]
Then save the file and upload it. Make sure to replace the old file on the server with yours.